Cosmokenney
Husqvarna
Pro Class
will be working on the insert here shortly.
Did you do this and take pictures?
As you all know, Coffee (Dean) passed away a couple of years ago. I am Dean's ex-wife's husband and happen to have spent my career in tech. Over the years, I occasionally helped Dean with various tech issues.
When he passed, I worked with his kids to gather the necessary credentials to keep this site running. Since then (and for however long they worked with Coffee), Woodschick and Dirtdame have been maintaining the site and covering the costs. Without their hard work and financial support, CafeHusky would have been lost.
Over the past couple of weeks, I’ve been working to migrate the site to a free cloud compute instance so that Woodschick and Dirtdame no longer have to fund it. At the same time, I’ve updated the site to a current version of XenForo (the discussion software it runs on). The previous version was outdated and no longer supported.
Unfortunately, the new software version doesn’t support importing the old site’s styles, so for now, you’ll see the XenForo default style. This may change over time.
Coffee didn’t document the work he did on the site, so I’ve been digging through the old setup to understand how everything was running. There may still be things I’ve missed. One known issue is that email functionality is not yet working on the new site, but I hope to resolve this over time.
Thanks for your patience and support!
will be working on the insert here shortly.


The Q4 is quieter because it has a baffle welded inside and they charge you $100 more for this.

This adds considerable back pressure. Alternatively you can add baffles that merely redirect the sound into the outer sound packing without adding the back pressure.

Even the insert can have a baffle added to reflect sound backward into the packing and not the exhaust exit.

No turn key options here unfortunately, but I did manage to scrounge up a project listed below if you were interested...
A crude drawing of added baffles, image A on top is a straight through baffle. Image B has baffles added to redirect the sound waves into the exhaust packing which quiets the exhaust without adding too much back pressure.

What You'll Need
1- Cutting tool to cut slots in your baffles, die grinder works
4- Fender Washers to insert and weld into the slots
Welding unit or torch (friend or shop if you don't have one) to tack the washers in place so they don't rattle
How To Do It
1. Take the baffle out of the pipe and remove the fiberglass packing.
2.With a hacksaw, die grider wheel, or chop saw cut 4 slices not quite half waythrough the baffle.
3.Find a couple fender washers that are the same diameter as the baffle pipe. You could just cut them in half or the line just above the hole in the center if extra baffle is needed.
4.This is what I used to put into the baffle.
5.Here you see one washer in the pipe.
6.Here are two washers.. and so on. Note: I would add baffles with such size to where you could not see directly down the middle of the tube like those shown in this picture. This would assure that the sound waves were being redirected completely and not straight out the pipe.
7.I split the pipe in half so you can see how the split washers will look inside the pipe. Weld them into place and if you feel like it grind off any burrs that are left, although it’s not necessary. Repack the fiberglass or if it’sbad then replace the packing. Reinstall the baffles and fire it up!
An alternative method I would use is to v-notch the washers and then place them 180° apart so that there were no line of sight for the exhaust to flow through. The more of these you had, the lower the dB output you would have. Remember to leave room for your insert at the end.

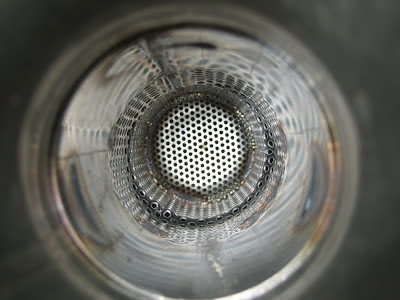
The baffle in the center of this Q4 is there in the middle. Had they used two half moon pieces instead of one solid piece, the sound pressure would have been reduced without so much back pressure.
I want to quiet down my FMF PC4. I already have a quiet insert and I am sure it's well over 96db. Do you have a picture of how this is done?Rather than going to the trouble of de-catting the oem big can muffler, I think a better option is to add baffles to an inexpensive silencer like the powercore4 and shed 5lbs of high center of gravity weight. Baffles such as half mood shaped wedges can be easily welded into the silencer at alternate angles as well as a smaller diameter insert. There is always a compromise between output power and noise. The big can is heavy and stifles the power considerably.


")